Tammy Kelton

Statement:
With this project the first thing that came to my mind is
landscape. I wanted to create a
landscape photo using trees.
Originally I wanted to simply create one tree. However after photographing many trees, and
sorting those photos, I found these two photos that were taken close together
formed a photo of a tree. So I
felt maybe it would be better to expand that thought to just connect these
photos to make a line of trees.
In preparing to create this project I spent a couple of days
photographing trees at the Salt River.
I shot everything from the roots to the canopy of the trees. I shot hundreds of photos to narrow it
down to the few I used. I chose
the photos based on the direction of the trunk, as well as, the directions of
the branches. I cropped and
layered these photos to create the line of trees. I chose to make the photo black and white for a couple
of reasons but the main reason was to make the sky the same color all the way
across. The alignment of the
photos was another area that needed work.
I decided to leave the top of the photo with a straight edge, and
allowed the bottom to have different lengths. I felt it added to the photo and gave it dimension.
Kwesi Appiah

Statement:
As a beginner in this field, I must be honest to say that
the first couple of days of class scared me a little. Going through the
syllabus and learning about the course contents were overwhelming for me. I
thought to myself, how am I going to be able to complete the various projects
to a good enough standard to be successful in this class. At the same time, I
was very determined to be successful, and to prove to myself that I was
capable, that I could learn the various skills in the time available. I know it
only takes practice to learn, but I felt like a fish in a pond for a minute. So
to me, the completion of this project brings me a sense of accomplishment.
I paid
attention to the examples that were given to us in class and took them home to
research on them. I looked at more photographs from the photographers that we
discussed in class. There were a few photographs that I found very interesting,
but I could tell that being able to reproduce them was going to be a challenge
because of my limited resources. I then decided that it would be more fun to
create my own images. I researched further and found some very interesting
ideas from which I created my own by using different subjects, different ideas
and different techniques that would enhance my images. I always had the Lines,
Shapes and Forms at the back of my mind, but I did not have a theme so I
decided to create as many interesting images as possible, and then form a link.
I shot some of my photographs at work, some at the local park, on a freeway
bridge and also a little studio at home. I am quite happy with how most of my
photographs turned out and happy with my final project.
Craig Kinsel

Statement:
One of my favorite addictions is rollercoasters. At one
point I wanted to become a coaster designer. Wooden or metal, chain lift or
magnetic launch, indoor or out, themed or simply a towering monster of crossed
planks, classic storied pieces of history or brand spanking new, I love them
all. They aren’t for everyone, causing anxiety and motion sickness in some. But
for the braver masses who flock to theme parks every year to wait sometimes
hours in line for a ride which lasts only a few minutes at most, a good roller
coaster is the stuff of life. I can’t ride any coaster just once, as each seat
provides a different experience. They are some of the things I remember most
fondly from vacations. I even felt the need for the comfort of a coaster when
my father died. This piece represents the thrill of the coaster, the
anticipation which starts when I take my place in line, my heart beginning to
race as the chain grabs the train for the trip up the lift hill, that first
slight dip before the true “first drop”, seeing how long I can keep my arms up
before needing to grab ahold of something, the screams at
the right places, “browning out”
over the massive g-forces and finally the stop just before the loading platform.
As my eyes are lead by the lines I can hear the roar of the coaster overhead
and as I follow the coaster around the track I hear and feel it stop at the
loading platform.
For this project I began just trying to find interesting
lines, shapes and forms to shoot. I wasn’t worried so much about finding a
“unifying theme” or anything of the sort. As I began accumulating photos, I
then began jotting down ideas of photos in a notebook that I remembered
shooting, trying to see if there were unifying elements – similar shapes or
similar lines. The first Wednesday after we had been assigned this project, I
saw the great lines, shapes and forms in the Coyote Center construction site on
campus. I was able to get in touch with the builder and get an escorted tour of
the site. Shooting away for about an hour I was able to get conduit, pipes,
ceiling, floor, and walls all in various stages of being built. That Saturday I was at a work thing off
Northern and the 17. There I remembered Castles and Coasters, so afterward I
took my camera there and shot photos of the coasters, rides and structures. At
this point in the process, I was thinking of going full black and white and
comparing shapes which occurred in nature with man-made shapes. When I was posting some of these images
to Flickr, I had the coaster loop near the CGCC footbridge. I noticed how these
seemed to go together as the footbridge looked to me like the loading platform
of a roller coaster. Thus was born this final concept. Using a process I
learned in my Photoshop class from last semester, I adjusted each individual
photo for luminosity, color balance, saturation and on some I sharpened them a
bit. I also did a little bit of adjusting to the entire image after the
arrangement was set, including dodging the curvy tree photo to lighten it up a
bit. The arrangement of the photos was done to look like the typical coater
with the loading platform, lift hill, first drop, and subsequent hills, drops
and turns. I thought of showing some “calmer” elements of the coaster in black
and white and the “more exciting” coaster elements in color.
John Anthony Muth
Statement:
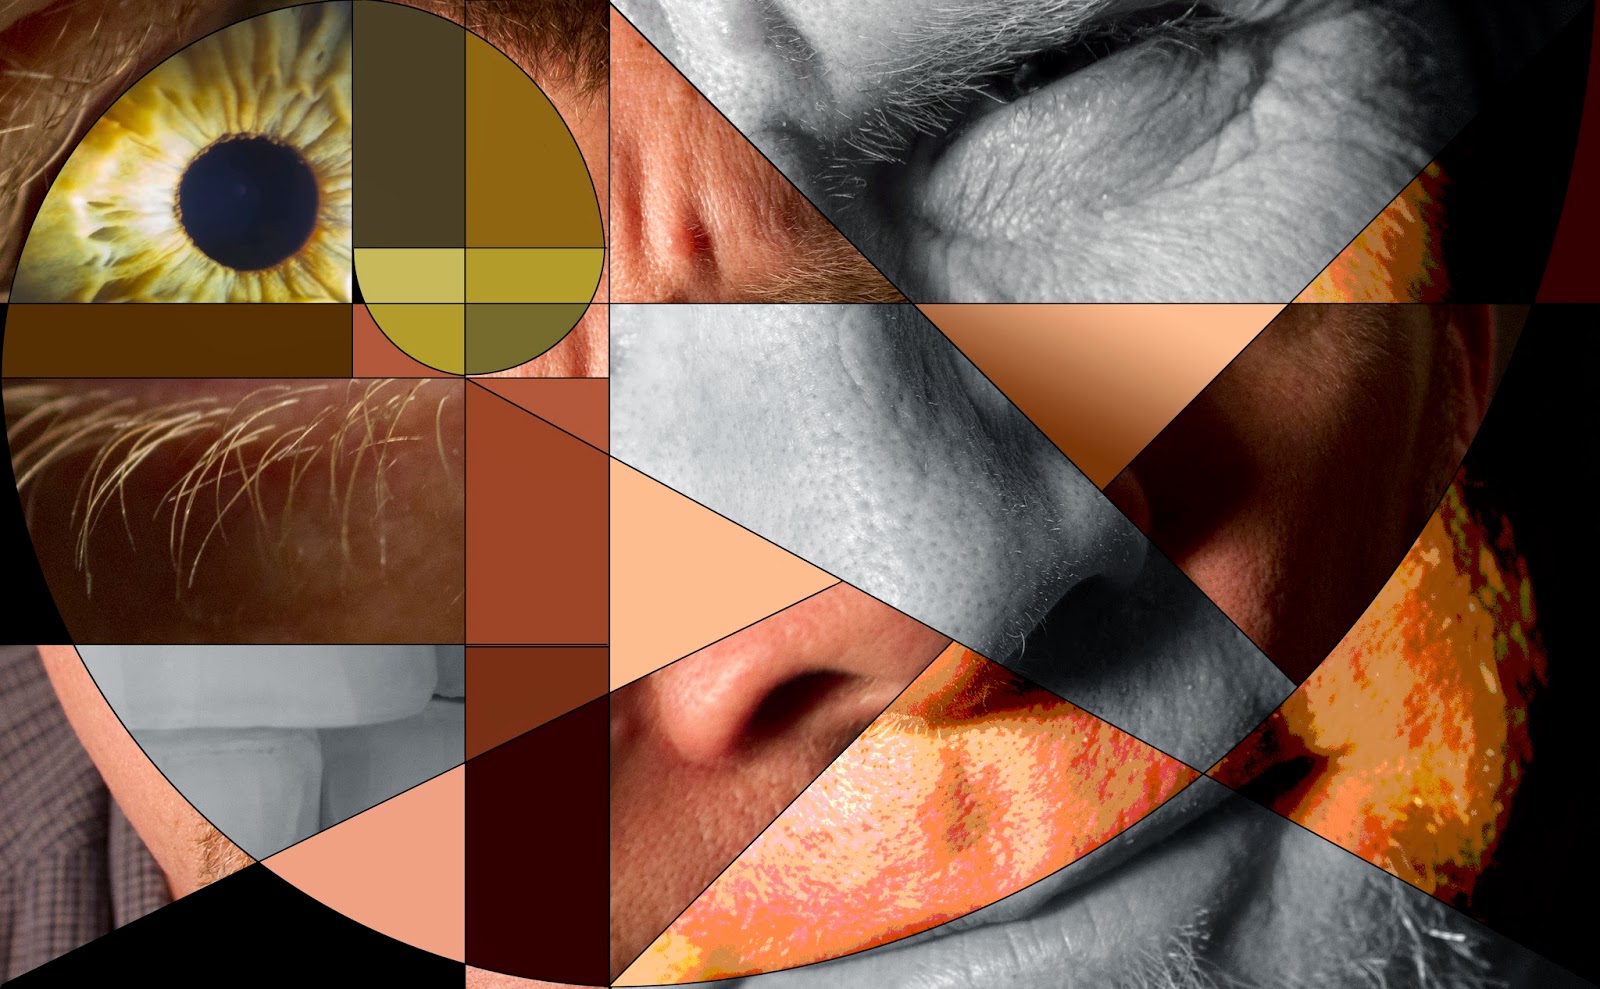
My concept was to incorporate the golden ratio and the golden spiral into my art work as well as to explore and incorporate the idea of Cubism. I chose a self portrait to create the work of art for this assignment.
The golden ratio sometimes called the golden mean or section (1.618…) was a concept studied by the Greeks like Euclid and Pythagorus and by great thinkers like Kepler, Da Vinci and Frank Lloyd Wright. The golden ratio is when two quantities are in ratio to the sum of the larger ratio of the two quantities (A + B is to A as A is to B). Thus the ratio can go on into infinity. The golden spiral is a logarithmic spiral whose proportions are directly tied to the golden section.
The golden ratio sometimes called the golden mean or section (1.618…) was a concept studied by the Greeks like Euclid and Pythagorus and by great thinkers like Kepler, Da Vinci and Frank Lloyd Wright. The golden ratio is when two quantities are in ratio to the sum of the larger ratio of the two quantities (A + B is to A as A is to B). Thus the ratio can go on into infinity. The golden spiral is a logarithmic spiral whose proportions are directly tied to the golden section.
Cubism is the idea that three dimensional objects can be analyzed and reassembled onto a two dimensional surface. Pablo Picasso and Georges Braque were the pioneers of this most influential art movement of the 20th century. Other artist such as, Jean Metzinger, Albert Gleizes and Juan Gris joined and expounded on this idea of seeing multi-angled subjects at the same perspective on a flat surface.
I chose a self portrait to complete this project. First, I shot approximately 50 images with a 100mm macro lens, a 50mm prime lens as well as a 23-135mm lens. Then I created my golden ratio as a 7” x 11.326” canvass in Photoshop. After that, I built my golden rectangles and golden spiral. Then I added what would be considered some Cubistic lines to add interest and I used angles with in the rectangle to complete the design aspect. I then took one large photo of myself to start and used several parts of that image so the viewer can “see” a portrait. Finally, I used another five images of different facial parts to complete the rest of the image. I used colors from my face to complete flat areas of design to enhance the overall design.
I really enjoyed this project and hope to incorporate more sacred geometry into my future projects and art work.
Darcie Naylor

Statement:
My project
depicts my love of baseball. Baseball is – and has been for decades – a huge
part of my and my family’s lives. My Grandpa played baseball as a young man in
the 1920’s and 1930’s, my grandmother played on a semi-professional softball
league in the 1930’s, I played softball until high school and all four of my
sons played baseball through little league. Our youngest son started playing
T-Ball at age 5 and only stopped playing competitively last year, having played
on club teams, varsity high school and college. Now I go and watch my grandsons
play, so the cycle continues. As you can tell, over the years I have spent
countless hours at various baseball fields. With that in mind, I thought I had
seen all there was to see at a baseball field. I couldn’t have been more wrong.
This assignment has given me new eyes. No longer do I just see a backstop
fence, or the shape of the infield dirt against the outfield grass, or a
baseball. Now I see lines, shapes, and forms that are interesting and
intriguing to me. From the blue skies that are a perfect backdrop for a game,
to the lines of the backstop and the green grass of the outfield, they are all
a part of the wonderful game that I love.
I honestly
had no idea what I wanted to do this project on so I just started taking
photographs of angles and lines and shapes that interested me one day when my
husband and I were out at a baseball game. I walked around and shot different
parts of the ballpark that interested me. When I got home from the game, I
looked at the pictures I had taken to see if something stood out to me and it
was then that I knew I wanted to make my project about baseball somehow. After
that, I took my camera when I went to watch my grandson play and took more
photos that day keeping lines, shapes and forms in mind as I shot. I then
gathered all of the images that interested me into Lightroom and began the
sorting process. I deleted blurry images and images that were not as
interesting of an angle or shape. I compared the images that I had multiples of
and chose the one I liked the best. When I had 6 images that really spoke to
me, I arranged them in Photoshop on a canvas and liked what I saw. To me it
tells the story of a baseball game from beginning to end – the blue skies, the backstop,
the privacy slats in the fence, the ball, the field, and the game begins!
Hayley Vrana

Statement:
The concept of my project was to create a Mickey
Mouse head out of pictures that I have taken. These pictures are an assortment
that I took in California Adventure in Cars Land. My pictures are communicating
the wonderment of a child through a Mickey Mouse head and that we all are
children at heart even though the pictures seem rustic and longstanding.
For my project I knew that I wanted to use my
photos from Disneyland to make something different, and at first I was just
taking lots of photos of anything I could think of. Then I thought “I love
everything Disney, but most of all I LOVE MICKEY MOUSE!” So then I knew that I
was going to make a collage out of my pictures to create a Classic Mickey Mouse
head shape. So once I knew I was going to do that I started taking photos of
Round objects all over Disneyland and California Adventure. I Just thought that
I would make the head out of all things from Disney so I made a collage where I
used all of the photos from all over Disney to create it. I liked the outcome,
but I wasn’t crazy about it so I thought I would just make a head out of one
subject like “Cars Land!” Once I figured that out I put a background up of oil
bottles and started using the magnetic lasso to isolate the circles to make the
ears. I also scaled and rotated the circles. After that I Found a picture of a
sign I took and skewed it to fit in-between the ears. Then I found photos that
helped round the bottom of the Mickey head , in which I skewed and cropped.
Then to fill the background I used a picture that I took from the Radiator
Springs Racers of the wooden tracks to create some lines and form.
Jeff Davis

Statement:
I've titled this composite photograph as "Agápe
(Love)." Agape is a Greek word
for love of a selfless variety. It
is often used to describe an unconditional love within a family. Whether love is returned or not, love
is still given. This photograph is
a composite made from the silhouettes of each member of my family. My wife and I are the vase or planter
from which our children grow. Our
love contains and supports them no matter what they grow into. From seed to bud... from bloom to
having seeds of their own... our love is always there whether they are a
prickly thistle or a velvety tulip.
Unconditionally.
As I experimented with a couple of things and searched for how
to approach this project, I was led back to the preliminary internet research
that I did when we first discussed line, shape, and form. One of the items that stuck out to me was
how to emphasize line and shape by backlighting a subject. I enjoy getting my family
involved. So, I set up a bench
against a blank wall and had them individually pose while I took side shot silhouettes
of them. I put my external flash in
slave mode, adjusted it to 1/16 power, and pointed it at the wall behind
them. I set up my camera
flash to act as the master trigger only.
I tried to keep the same repeated set up, composition, and focal length,
but had to allow some variation due to differences in height, hair volumes,
etc. I started on a tripod, but
soon found it was quicker and easier to shoot by hand to deal with the
variations and moving targets.
In Lightroom, I cropped the photos down to get more
consistent composition, and I adjusted the curves and levels to reduce the
shades of whites and blacks. Then
I took them all into Photoshop and pieced them together on a black
background. I arranged the photos
in the general area I wanted and then adjusted the layers opacities to allow me
to more easily see the layer interactions and place them more precisely. I used they the layer hierarchy and
layer masks to hide parts of some picture and bring out others. I used layer inversions to convert some
black and white photos to white and black. And I used layer fill to generate the grey stripe.
Justin Proctor
Statement:
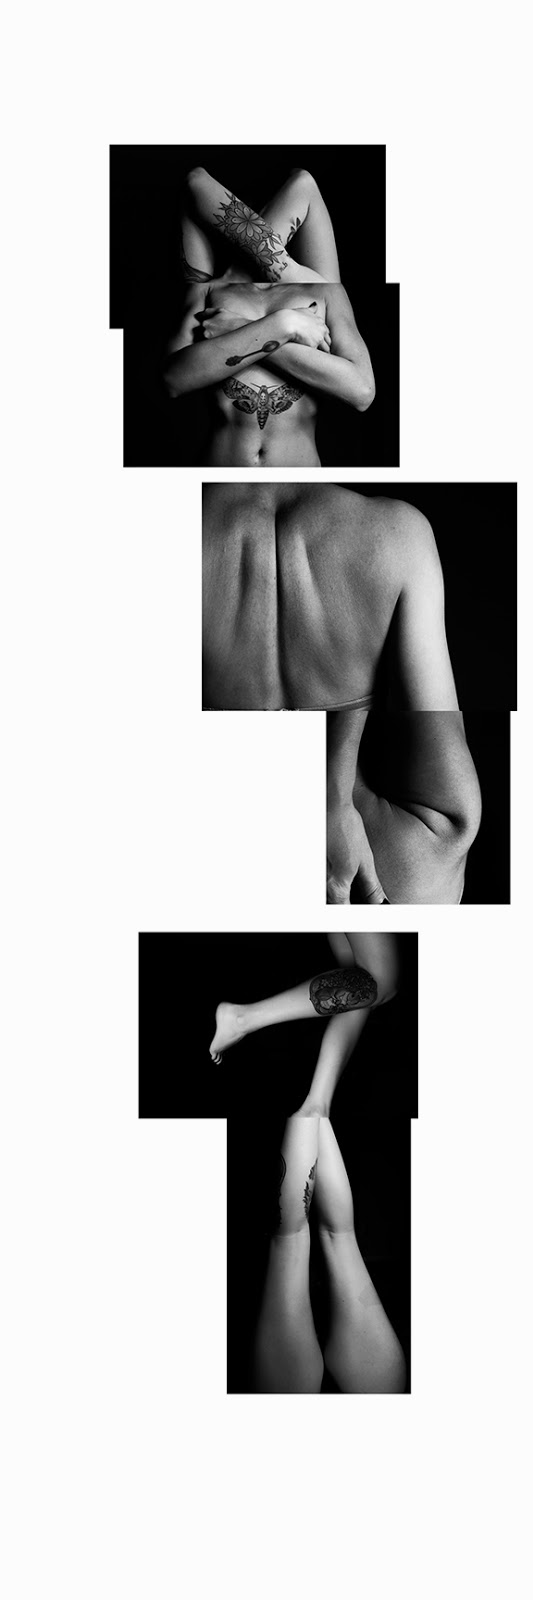
At first my
concept was to create a shape out of the line of the body. As I lined up
different photographs I wasn't pleased with how literal it was. Then, I
switched my concept to something more abnormal. My new concept separated the
body into different parts and used those sections to create new forms. The top
set would use parts of the top of the body, the middle set parts of the torso,
and the bottom set the legs and feet.
I printed out all my pictures on 4x6 paper. The hardest
part for me was to find 6 images out of the 69 that I had chosen. I laid out
all the photos on the floor and started arranging different ones to create
different shapes. As I saw how different photographs lined up, I decided that I
was going to do 3 sections of 2 photos. Also, when a person looks at somebody
they look up to down or visa versa, so I decided to put the 3 sections together
vertically. In the first and last set I used the outlines of the body to
connect them, but I didn't want all 3 to be the same. In the middle set I used
the empty space to connect the images.